Friday, September 23, 2011

Chicken Garlic Pizza with Whole-Wheat Rosemary Crust


=


When I'm not cooking or engaging my computer screen in an hours-long conversation of slow blinks, I work at a pizza restaurant. Though I don't work in the kitchen, I come home nightly saturated in the scent of cornmeal and pizza grease--yet somehow I haven't gotten tired of pizza. (Though this is the same girl who has eaten a PBJ with a side of Cheetos and grapes every year for her birthday since she was 8...some foods just remain delicious.)

It's just such a versatile dish, with so many possible styles and toppings, that it's hard to think of a world in which I'd say "As God is my witness, I'll never eat pizza again."

Until last night, all I'd made within the realm of pizza  was flatbread topped with swiss, pancetta, and caramelized onions and a chicken alfredo pizza baked on panini bread. But I just came into possession of a pizza stone and was ready to tackle the actual dish. Not on my own, though. My co-chef (graduated from sous-chef) was able to offer some of the expertise he gained living in Italy for a total of seven years, for which I'm endlessly grateful.

Not that our pizza was full-on authentic, obviously, but we weren't trifling with no Lunchables, ya heard?


We decided to make the dough from scratch, despite my past tragic battles in this arena, because it's just more fun and rewarding, I think, then getting a pre-baked crust or a tube of dough. And how else are you going to learn if you don't just throw yourself in? (I'm going to move on quickly from this train of thought, before my blog starts sounding like a Grey's Anatomy end-of-episode pep talk.)

For the dough, we combined a cup of whole-wheat flour, active dry yeast, warm water, oil and brown sugar. Stirring this together, we then added three cups of all-purpose flour, a teaspoon and a half of salt, and the fresh rosemary, which Andy stopped me from throwing in before it was fully chopped and de-stemmed. Thank you, Andy! (To be said like the Dude addresses Donny after being informed that his phone is ringing. But for real, my co-chef is a blessing.)

I stirred this up with a wooden spoon, which was a little unwieldy, but doable. Afterward we turned the dough out onto a highly floured work surface. Do not skimp on flour! This is the main lesson I've learned. Otherwise everything falls apart and the dough tries to become your new skin instead of staying put on the counter.

I then kneaded the dough until it was well-combined and hardly sticky, just elastic. We then oiled the bottom of a medium bowl, set the dough inside, and then turned it a few times to coat. The bowl was set in a warm place with a dish towel over it to rise for about 45 minutes to an hour (I believe we let it go for about fifty minutes.)

After the dough's been rising for fifteen minutes, we put the pizza stone in the oven and preheated it to 500. The dough recipe advised that we preheat for at least an hour.

Now on to the toppings! (I'm so sorry about the length of this blog.) I seasoned the chicken breast with cumin, oregano, paprika, garlic powder, and black pepper--using the helpful advice of a commenter on Allrecipes--and cooked it in a skillet. The original recipe called for the chicken to be cooked in bowling water, but that just seemed so bland to us.

The chicken, mid-cook
After the chicken was all-the-way-cooked (Andy checked), he transferred it to a plate, let it cool for a few minutes, and then diced it up roughly.

For the base, Andy melted butter in a small skillet. Once the butter had started to melt, he added chopped green onions, dried basil, and minced garlic. We had placed a bowl in the freezer to chill it, then retrieved it, poured in the herb butter, and put it into the refrigerator to set.

The dough had doubled by now, so I turned it out onto the now-oiled work surface and pressed down on it gently with my (not naturally) oily hands. Then I cut it in half. I divided one of the halves again, formed them both into balls, and stored them each in a Ziploc bag in the refrigerator, where they'll keep for up to three days (though we already used one last night to make a second smaller pizza).

I formed the remaining dough into a "ball" (picture way, way above), covered it with a towel, and let it rest for twenty minutes. This was perfect time for the butter to set, the cilantro and tomatoes to be chopped, and the Parmesan to be freshly grated.

(Here I was going to rant about how Parmesan is just not a pretty cheese, but I'm certain I am barely holding on to your patience.)


The set-dough had a really nice texture to it--a little drier but still very elastic--and it was easy to push out into a thin flat circle. Andy kept calling for it to be thinner--Italian-style--and the crust and I conformed as much as we could.

For the toppings, we spread the herb butter over the pie using the back of a spoon. Next came the diced chicken, then I dotted clumps of ricotta all over, followed by the tomatoes and then the chopped cilantro. Over all this, Andy sprinkled a few handfuls of Parmesan cheese.

With all this, we still had plenty of toppings left for the second, smaller pizza we made. All we had to do was remake the base.

The original pizza.
At this point, we realized we did not have parchment paper on which to rest the pizza atop the stone. The stone's not a necessity for your own pizza-making, of course, but the ceramic base does help distribute the heat, and I highly recommend it. Normal baking sheets will suffice, though, I'm pretty sure. (Here is where I point out that Google knows much, much more than I do.)

We awkwardly relocated the dough from the work surface onto a sheet of foil. The second time through, we made sure to do this before adding the toppings. Learn from your mistakes.

The dough recipe called for the pizza to cook for 8 minutes, but ours was in there for about eleven and the crust was perfectly crispy without burning at all.


The crust was ohhh, soooo yummmmy too. I'm usually not one for finishing the crusts on things, but I could not get enough. Flavored crusts are definitely the way to go.

So there you have it! Choose your crust flavors and toppings and bake away.


Whole Wheat Rosemary Pizza Dough (via Pinch My Salt)
1 1/2 C. warm water
2 T. extra virgin olive oil
1 t. brown sugar
1 C. whole wheat flour
1 package active dry yeast or 2 t. instant yeast
3 C. all-purpose flour plus extra for kneading
1 1/2 t. salt
1 sprig fresh rosemary, leaves removed and chopped

Chicken Garlic Pizza (via Allrecipes.com)

  • 1 skinless, boneless chicken breast half
  • 2 tablespoons butter or margarine, softened
  • 2 cloves garlic, minced
  • 2 tablespoons chopped green onion
  • 1/2 teaspoon dried basil
  • 1 (10 ounce) can refrigerated pizza crust dough
  • 2 roma (plum) tomatoes, diced
  • 1/2 cup chopped fresh cilantro
  • 1/2 cup ricotta cheese
  • 1/4 cup grated Parmesan cheese
  • cumin
  • oregano
  • garlic powder
  • paprika
  • ground black pepper

Friday, September 9, 2011

Curried Chicken Salad


I wanted something delicious for lunch today, and this ended up hitting the spot perfectly (with plenty of leftovers!). I've been wanting to make chicken salad for a long time, and my favorite part about this recipe is that I didn't have to shred any chicken. Plus all the fresh fruit.

It turns out that being out of school and hitting the market before noon results in you being the only person there under fifty. But we all got along marvelously, and I even convinced an elderly woman to buy some mangoes with me! One niggle that I'm working on: everyone else was saying hi to each other and having conversations except for me. But I will make them my friends (the same way I'll never go hungry again!)

Once home, I started off by coating my chicken quite thoroughly in kosher salt. I let it sit for fifteen minutes, turning it over every five minutes, then rinsed all the salt off the chicken.

Meanwhile I peeled, pitted, and cut up my mango. This proved difficult both because of the messy process itself and because I kept munching on the mango I had managed to surgically remove.


Then I poached the chicken for a year and a half. Seriously, this took forever. First I brought a large pot of water to barely-a-simmer. I think my mistake was that I had too much water and maybe I didn't get it hot enough in the first place. But it all worked out okay. The recipe calls for you to poach the chicken for six minutes uncovered, then remove it from heat and cover it and let it finish cooking for 10 to 12 minutes. 10 to 12 minutes is a lie. For me and my inadequate cooking water, it was more like twenty minutes. Then I took it out, cut it into smaller pieces, and let it cook for a little longer. In the end, I ended up with very tender chicken, all the way cooked, so it was a sort of blessing.

For the dressing, I combined mayonnaise, plain Greek yogurt, curry powder, fresh-squeezed lime juice, honey, ginger, salt, and pepper in a bowl and whisked it together. The curry taste was a little overpowering, so I added a bit more yogurt and mayonnaise to even it out. (The remainder of the lime went into my Diet Coke.)


While the chicken was wandering around the desert with the Jews, I halved a bunch of red grapes, chopped a red onion, and chopped up the cashews as well, tossing this all into the same bowl as the mango.

I let the finally-cooked chicken cool for several minutes, then sliced it into 1/2-inch pieces. These pieces were stirred into the dressing, which was stirred into the mango mix, which was all shoveled into my mouth (practically).

Good for sandwiches too!

Curried Chicken Salad (via the Gourmet cookbook)
For salad:
4 skinless, boneless chicken breast halves (1 1/2 lbs)
2 tablespoons kosher salt
1 medium red onion, chopped
1 firm but ripe mango, peeled, pitted, and cut into 1/2-inch pieces
1 cup red seedless grapes, halved
1/2 cup salted roasted cashews, coarsely chopped

For dressing:
1/2 cup mayonnaise
1/3 cup plain yogurt
5 teaspoons curry powder
1 tablespoon fresh lime juice
1 teaspoon honey
1/2 teaspoon ground ginger
1/2 teaspoon salt
1/4 teaspoon freshly ground black pepper

1. Poach the chicken: Coat the chicken  with kosher salt in a bowl. Let stand at room temperature, turning once or twice, for 15 minutes.
Rinse the salt from chicken. Poach chicken in a 3- to 4-quart saucepan of barely simmering well-salted water, uncovered, for 6 minutes. Remove  from heat and let chicken stand in cooking liquid, covered, until just cooked through, 10 to 12 minutes. Transfer chicken to a plate and cool for 10 minutes.
2. Meanwhile make the dressing: whisk together mayonnaise, yogurt, curry powder, lime juice, honey, ginger, salt and pepper in a large bowl.
3. Assemble the salad: Cut chicken into 1/2-inch pieces and add to dressing. Add onion, mango, grapes, and cashews and stir gently to combine.

Tuesday, September 6, 2011

Quinoa and Pistachio Salad with Moroccan Pesto


Y'all, this was so delicious. And not difficult or expensive at all! I was able to make it with aplomb under all sorts of hostessing pressures. I produced this last night as a vegan option for our Grilltacular (an all-day blowout that was very successful, but very shambly as well--shambly being the adjective for things that leave your house in a concerning state.)

I didn't do any of the grilling myself, but I did make andouille and beef burgers with caramelized onions and spicy mayo, using a recipe I got from Epicurious. Everything that came out of the grill (chicken, bratwurst, boudin, bacon, burgers, bacon, corn on the cob, kebabs, hot dogs, bacon) was very tasty and it's a crime I couldn't make myself hungrier. 

For the salad, I began by preheating the broiler. Then I halved and seeded my red bell pepper. I put the halves on a foil-lined baking sheet and roasted the pepper for 12 minutes. While it was roasting, I boiled the quinoa in a mixture of veggie broth, orange juice, and water. As it came to a boil, I covered it, reduced the heat, and let it simmer for 12 minutes. These things just cook themselves and you get so much time to finish your other tasks or open another beer or make small talk with all the friends who were nice enough to let you feed them and give them beverages!

The Moroccan pesto is a mixture of parsley, cilantro, olive oil, garlic, lemon juice, cumin, kosher salt, and ground red pepper. Chop the things that need to be chopped (parsley, cilantro, garlic) and combine everything in the food processor. Process.

After the bell pepper's nicely roasted, let it cool in a covered container (the recipe says zip-loc bag, but I just put it in a tupperware container for 10 minutes before peeling it and chopping it. All my components came together in a nice, timely fashion, and I consolidated the pesto, bell pepper, quinoa, and chickpeas into one bowl. I did not use olives, because I do not like olives (here I was going to say "unless they are extra-virgin and oily," but you can imagine how I stopped my typing fingers in mortification.) I sprinkled the pistachios on top.

Voila! You have now provided your guests with a vegan option! (Note: this dish was heartily celebrated by non-vegans too.)


Quinoa and Pistachio Salad with Moroccan Pesto (via Cooking Light's Way to Cook Vegetarian)
1 red bell pepper
1 cup uncooked quinoa
1 cup organic vegetable broth
1/2 cup water
1/2 cup fresh orange juice
1/3 cup coarsely chopped cilantro
1/4 extra-virgin olive oil
2 tablespoons coarsely chopped fresh flat-leaf parsley
3 tablespoons fresh lemon juice
1/2 teaspoon ground cumin
1/4 teaspoon kosher salt
1/4 teaspoon ground red pepper
2 large garlic cloves, coarsely chopped
1 15.5 oz can chickpeas, rinsed and drained
12 oil-cured olives, pitted and chopped (I left these out, not a big fan of olives)
1/4 cup chopped pistachios


1. Preheat broiler.
2. Cut red bell pepper in half lengthwise, discard seeds and membranes. Place pepper halves, skin sides up, on a foil-lined baking sheet, flatten with hand. Broil 12 minutes or until blackened. Place in a zip-top plastic blag; seal. Let stand 10 minutes. Peel and chop.
3. Place quinoa, broth, 1/2 cup of water, and juice in a large sauce pan; bring to a boil. Cover, reduce heat, and simmer 12 minutes or until liquid is absorbed.
4. Place cilantro and next 7 ingredients in a food processor; process until smooth. Combine bell pepper, quinoa mixture, cilantro mixture, chickpeas, and olives in a large bowl. sprinkle with nuts.
(Yield: 6 servings; serving size: 3/4 cup)

Saturday, September 3, 2011

Asparagus Pesto Grilled Cheese Sandwiches

In hindsight, I should have cut this diagonally for the picture. But hunger does funny things to my logic.
For dinner last night, I was interested in something light and fairly simple, having indulged in half hoagie earlier in the day. If it is possible to overdose on sandwiches, I would have done so at any occasion where they serve those little chicken salad numbers on platters, so I felt safe in repeating myself here.

I wasn't a huge fan of pesto until I started cooking ("Isn't that wonderful?" Lucille Bluth might say) and using it for myself. The appreciation severely spiked when I started making it. That seems to be the truth about most sauces--they taste better somehow when you do-it-yourself and you can adjust the flavors and see each ingredient that goes into it. (Although sometimes my ambition gets the best of me and things burn and I cry and have to sacrifice myself to the storebought sauce gods. But it never hurts to try again.)

Anyway! After scouring the archives of my encumbered StumbleUpon account, I happened upon these grilled cheese sandwiches. Grilled cheese was one of the meals I could do masterfully well long before I could eyeball a tablespoon of olive oil, and I was very intrigued by the pesto.

First I blanched half a bunch of asparagus, though the water took far too long to come to a rolling boil--I assume this is because I kept watching it--and I ended up re-icing my bowl of water a couple of times. Meanwhile I toasted the pine nuts for 5 minutes at 350 degrees and zested and juiced half a lemon. I learned a handy tip for juicing lemons too--zap it in the microwave for 10 seconds, then roll it around on your counter, then cut it open and unleash a veritable fountain of citrus essence!

I need to learn a trick for zesting soon, because instead of being a wizard at that, I just ended up grating my thumb knuckle.

I chopped up my newly (finally!) blanched asparagus and threw it into the food processor along with 1/2 cup of spinach (though I think I overshot this a little, which would explain the bright, bright green of my pesto, though the flavor was fine. I made a broccoli and cheese soup a while back with pureed baby spinach and the color and taste were both absolutely delicious. I ate it while watching "Big Girls Don't Cry...They Get Even" on TV, which stars both Jenny Lewis and Cory Matthews, so it wins. Memmmooooriiiiiies.)

Along with those two ingredients, I added a clove of minced garlic, the zest and juice from the lemon, toasted pine nuts, olive oil, and a little bit of salt and pepper for seasoning.


Now it's really just smooth sailing from here. The winds of foreign Pesto will no longer bandy you about. I lightly toasted my bread--a little too light at first, because I was having difficulty buttering it--and then added a slice of Gruyere and a spread of pesto to two of the bread slices.


Then I heated up my skillet. The original recipe called for a little-lower-than-medium heat, but that was taking far too long to cook. I ended up adding a little more butter to the skillet itself and putting the heat at medium, while using my cast-iron to press the sandwich down as it cooked. This will definitely reduce the cooking time, so be careful, but it did the job in terms of melting the cheese and getting the sandwich nicely toasted. I also recommend doing only one sandwich at a time to avoid overcrowding. Overcrowded sandwiches do not like to transform into crispy melty goodness.

There you have it! Simple weeknight meal. If you're inclined to try something much more difficult but even tastier, I recommend peanut butter and jelly (I almost typed "jealousy," which has inspired me to invent the peanut butter and jealousy sandwich out of who-knows-what, but it's gonna happen!) sandwiches with sides of Cheetos and grapes. Good luck on your endeavor!

Asparagus Pesto Grilled Cheese Sandwich (via Closet Cooking)
Serves 2.

4 slices whole-grain bread, lightly toasted
2 slices Gruyรจre
1 tablespoon butter
2 tablespoons Asparagus Pesto

Asparagus Pesto
1 cup asparagus, blanched
1/2 cup baby spinach
Zest and juice from 1/2 lemon
4 tablespoons Parmesan, grated
2 tablespoons pine nuts, toasted
3 tablespoons olive oil
1 clove garlic
Salt and pepper, to taste


Monday, August 29, 2011

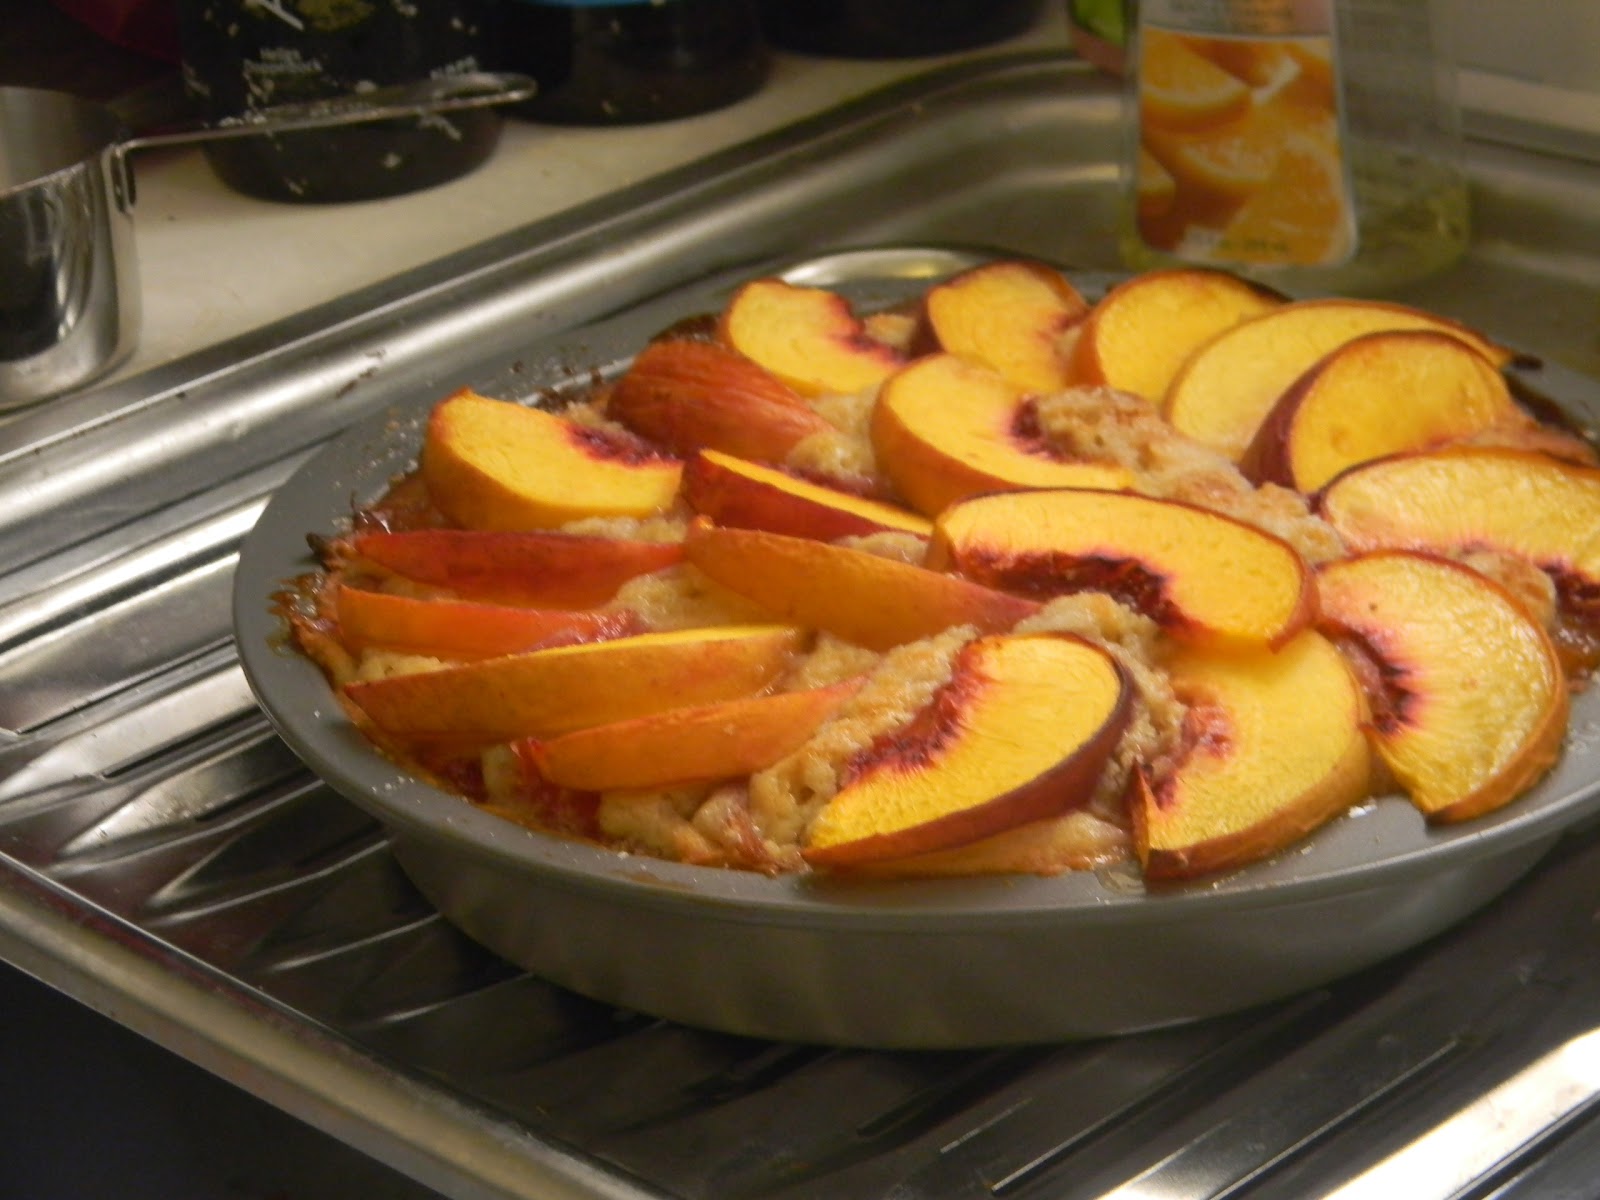
Summer Peach Cake

Eat the pain away.
Before making the delectable circle of peachy goodness displayed above, the closest I'd come to making a cake from scratch was getting the portions wrong on a box of red velvet cake mix and--with a little bit of feverish, not-exactly-detail-oriented improvising--somehow producing something edible.

(Side salad: the combination of staring at that picture and being hungry incited me to get up from the couch and procure leftovers from the fridge. Still delicious!)

This was a little nerve-wracking. I'm not very adept with baking and flour and whatnot all the time. When I made Beef Wellington, I ended up practically painting on the dough, but that's neither here nor there (though that tear-inducing, ultimately-not-disastrous adventure would have made for a heart-stopping post...sponsored by the good folks at Hyphen-City.)

I went to the neighborhood market and picked up my ingredients, including peaches (obviously) and peach schnapps. Cooks Illustrated recommends macerating the peaches in sugar, schnapps, and a little bit of lemon juice to enhance the flavor.

First I preheated my oven to 425 deg, then I chopped up the peaches into roughly 1/2 inch wedges.


Then I set aside about 24 of those and cut the rest of the wedges into thirds. Everything got all macerated, and then I spread the peach chunks (not the elite 24) in a single layer on a pan wrapped in foil and misted with Pam.

Baked the chunks for 20-25 minutes. Here's where Lucie got antsy, because once the baking finished, I had to cool the chunks to room temperature on my makeshift wire rack for 30 minutes. And all I wanted to do honestly is get that cake in the oven so I could eat it in time for work.

Whenever you feel is a good time for you personally, as a human being undertaking this recipe, to start making the batter, you go ahead and do that. But probably don't wait too long. Use your judgment.

I whisked together flour, baking powder, and salt. Then I peeled the label off my new cake pan and Pammed it. Then I remembered I had to melt the butter and cool it completely, so I'm glad I started in on the batter before the peaches were even out of the oven.

(Once you do pull the peaches out, reduce the oven temp to 350 and applaud yourself on being well on way your way to the world of good eating.)

In another bowl, I whisked together eggs, brown sugar, and 1/3 cup of granulated sugar until it was nice and smooth. To that I added sour cream, vanilla extract, and 1/4 tsp of the almond extract. As my peaches cooled, I happily combined the two batter bowls into one delicious batter. I strove heroically to save most of the batter for the cake and to stop being an overzealous "taste-tester."

Peach time! First I crushed up some panko and tossed the peach chunks. Next I poured half the batter into my pan and smoothed it over with a spatula, then added the recently-cooled peach chunks, pressing them down into a single layer. Poured in the rest of the batter. Then I took the reserved wedges and placed them in a circle atop the batter. Then I realized I had them facing the wrong way, so I jumped in for a quick amendment before adding the rest of the sugar, moistened with 1/8 tsp of almond extract, to the top of the cake.

Then with my eyes large and proud with hunger, I put the cake in the oven for about an hour.


After retrieving the cake from the oven, I was forced to watch it cool for two to three hours (I compressed the wait with a little freezer time, so I could enjoy a slice before work.)

And voila! Summer peach cake and a dwindling of my baking fear.

Summer Peach Cake (via Cooks Illustrated)


  • 2 1/2pounds peaches , pitted and cut into 1/2 inch-thick wedges
  • 5tablespoons peach schnapps
  • 4teaspoons lemon juice
  • 6tablespoons plus 1/3 cup granulated sugar
  • 1cup (5 ounces) all-purpose flour
  • 1 1/4teaspoons baking powder
  • 3/4teaspoon salt
  • 1/2cup packed (3 1/2 ounces) light brown sugar
  • 2large eggs
  • 8tablespoons unsalted butter , melted and cooled
  • 1/4cup sour cream
  • 1 1/2teaspoons vanilla extract
  • 1/4teaspoon plus 1/8 teaspoon almond extract
  • 1/3cup panko bread crumbs , finely crushed

Turkey Marsala and Cheese Tortellini with Sage-Walnut Butter


The first real post!

So I made this yesterday and then came up with the idea to start this blog today. Partially because I was so psyched about how delicious everything turned out to be. It's never easy cooking a whole meal at once. I have to open up whole Word documents, paste all the recipes inside, and mutter to myself a whole bunch as I read the directions over and over again. You know it's serious when I've got a Word document going on.

Yesterday I had some hot waitressing money burning a hole in my pocket (at work I don't get real pockets. Just aprons and skorts. The skort is awful. It is the bane of my thighs' existence. Anyway!), so I thought, "Why don't I throw together a meal for myself and my roommates?" It's always a good feeling to share, although I have been known to make enchiladas for myself because I had time to kill, the recipe was taunting me, and no one else was around.

The meal ended up as such: Turkey Marsala, cheese tortellini with a sage-walnut butter, and summer peach cake for dessert (I'll save the cake for another post. This title is already so long.)

I started off by throwing two packages of cheese tortellini into the ol' pot of boiling salted water.

Here's where my little error comes in. If I could explain why this happened, I so would to help any readers out...but to be honest, I don't think you should worry. There's a certain category of mistakes I make that fall under "Only things I do." Like the time I accidentally drove on the levee and a bunch of cattle angrily stalked me, lowing and stomping all the while. Or when I thought I'd lost $97 and it ended up being in my pocket. These things just happen.

So this time: I put balsamic vinegar, honey and bay leaf in a small saucepan over medium heat. My boyfriend was already complaining about the overpowering smell--while I stoically dealt with it--when without coming close to overshooting the 4-5 min. time limit, I managed to burn the whole lot. Burnt balsamic syrup will overpower the heck out of you. We just decided to toss it, rather than waste time scrubbing the pan and starting over, and ultimately we just subbed balsamic vinaigrette. And it still tasted delicious. I have become very friendly with substitutes. Not in the way that a high school girl with loose morals and a sagging GPA does, but in the way a beginning-cook with a clumsy side and a tendency to misread recipes gets to know her various saviors.

That snafu aside: I melted 6 tablespoons of butter in a skillet, added a cup of walnuts and the sage leaves, and let the walnuts toast. Suuuuch a good smell. Much better than sizzling balsamic syrup, you have no idea. After three minutes, I added a cup of water from the boiling tortellini. Not easy to fetch when tortellini is boiling all about.

As the butter reduced by half, I strained the tortellini (reserving 1/2 cup of cooking water) then added it to the skillet. Toss the tortellini in the butter. Here's where you're supposed to add the cooking water as needed. I, of course, forgot I'd even reserved it. It just sat by my sink while I tossed the tortellini willy-nilly with a 6 oz. pkg of Parmesan.

Tortellini done!

Now I started the Turkey Marsala during this process. About the time the tortellini butter was reducing. I chopped up a small red onion and cooked it up in my large bottle of olive oil, which is sadly depleting. Though I actually don't mind, because the excitement of getting a new special bottle of olive oil will make up for the loss, I think.

Once the onion started to turn golden and the aroma was engulfing me (here is where I recommend actually burning the balsamic syrup like I did earlier, because the scent of sweet relief enhances anything, I believe. Just like things taste better when they're free or you cooked them yourself! It's science. I am a freelance scientist at times.), I added the bag of baby spinach. As the spinach was wilting, my boyfriend patted the turkey cutlets dry and seasoned them up for me. He often reminds me that I need to cook things all the way through, lest I poison people. I get impatient and become colorblind to meat-pinkness. This, among other reasons, is why I value him.

I slid the spinach and onions out onto my readied plates, then added the turkey cutlets. Once they'd been seared well, Andy flipped up the better-done-side and I placed a half-slice of proscuitto and a slice of Fontina atop each cutlet. Then we covered the skillet and let them finish for a minute.

The cutlets were nestled into spinach beds. Then I poured a little Marsala into the skillet, let it reduce while I scraped up those pesky brown bits you're always advised to scrape up, and then boom, boom, boom...it was Turkey Marsala and cheese tortellini with sage-walnut butter time. A merry, merry time for all.

The recipes:

Turkey Marsala (via Epicurious):

2 tablespoons extra-virgin olive oil
1 small onion, chopped
5 oz baby spinach
4 turkey cutlets
2 tablespoons unsalted butter
2 slices prosciutto (1 oz), halved crosswise
2 oz Italian Fontina, thinly sliced
1/2 c sweet Marsala wine


Tortellini with Sage-Walnut Butter (via Food Network)(they used ravioli):


  • Kosher salt
  • 1/4 cup balsamic vinegar
  • 2 teaspoons honey
  • 1 bay leaf
  • 2 9-ounce packages refrigerated cheese ravioli
  • 6 tablespoons unsalted butter
  • 1/3 cup fresh sage leaves
  • 1 cup walnuts, roughly chopped
  • 3/4 cup grated parmesan cheese


Sunday, August 28, 2011

Introduction

Hello, good people! As a 22-year-old recent college graduate with an ill-used creative writing degree and a love for cooking, I thought a blog in which I summarize/illustrate my cooking experiences could be pretty amusing. I've got an addiction to social media (as well as reading cookbooks, crossword puzzles, inhaling the entire runs of TV programs in short spans of time, quality beer, and making puns), so I've been microblogging my culinary forays from the get-go.

I really only started cooking about a year and a half ago. My parents gave me a Better Homes & Gardens cookbook for Christmas, along with the heavy hint that I should learn something from it. Up until that point, my skill-set consisted of Heating Pockets and Easily Making Mac. I started with breakfast. I'm a big of fan of dishes involving eggs and cheese at any time of the day. Then I expanded into recipes I stumbled-upon online that looked doable. And after a few hot messes, I started creating things of which I was really proud which were also delicious. Y'all, cooking is way more of a blast than I ever thought it could be. Now I salivate walking down the cookware aisles of supermarkets. I rejoice in buying new spices. I read cookbooks in my free time. It's unreal.

I'm absolutely no expert. I'm still very messy. My boyfriend has to make sure I cook meat all the way through.  But I'm having a ton of fun, and I thought I could add to that by throwing in writing and chronicling and little asides and anecdotes. I'm involving my sisters too, who are both wonderfully witty and hilarious and much more talented than yrstruly in the kitchen. All in all, I hope to expand my personal record-keeping and share some of the dorky fun I've been having along the way.

Enjoy!