Showing posts with label French. Show all posts

Wednesday, August 20, 2014

Stuffed Tomatoes à la Grecque


Here's another outing with Indie Plate ingredients. Indie Plate is a Baton Rouge, La.-based grocery delivery service, sourcing from farms and artisans all around the regions and then bringing that bounty straight to your doorstep.

Rotten tomatoes you toss at things you find odious and offensive (like bad movies, for instance). Fresh, local tomatoes...you treasure those babies. You find a way to spotlight that natural sweetness and bright color.

And then I guess you eat them or whatever. Your mileage may vary!

To glorify my lovely tomato babies (which came from Morrow Farm out of Ponchatoula, La.) I turned to the masterful Gastronomique. French cooking can be daunting, no lie, but the recipe for stuffed tomatoes à la grecque was simple enough and served my aim to make something simple, well-spiced, and pleasing to the eye.

My one problem: someone stole my damn saffron. I am just mad about saffron (that is, my kitchen's current lack of it)! (It is probably not stolen. I misplace things.) So anyway, I substituted turmeric and the world moved on.

Ultimately, I produced two tomatoes teeming with toasted, spiced rice and golden raisins. And now you'll be able to as well! Recipe follows.


Stuffed Tomatoes à la grecque (from LaRousse's Gastronomique)
Serves 2 as side or appetizer.

Ingredients:2 homegrown tomatoes
1/2 cup jasmine rice
1/2 cup golden raisins
Pinch of powdered saffron (I used turmeric as a less costly substitute)
1/2 teaspoon salt
1/2 teaspoon pepper
Pinch of cayenne
Bouquet garni (mine consisted of 1 stalk celery, 1 medium carrot, 1/2 medium white onion, all chopped, and two sprigs thyme—tied up in cheesecloth which was folded over just once)
Olive oil

1. Soak the golden raisins in 1 cup lukewarm water until they swell, then drain.
2. Heat two tablespoons olive oil in a saucepan over medium-high heat. Add rice and toast, stirring frequently, until the grains become transparent.
3. Add 1 cup boiling water to saucepan, stirring to make sure rice does not stick to bottom of pan. Add saffron, salt and pepper, cayenne, and bouquet garni.
4. Return rice to a boil and then cover and simmer until rice is all the way cooked (about 20–30 minutes).
5. Preheat oven to 475. Slice the tops off the tomatoes (reserving tops) and remove pulp and seeds. Season the inside of the tomatoes with salt and then turn them upside down to drain in colander.
6. Once the rice has cooked, drain and cool before stirring in raisins. Taste and reseason as desired.
7. Dry the hollowed tomatoes and then drizzle 1 teaspoon olive oil inside each tomato. Fill each tomato with mixture and then replace the sliced top.
8. In an ovenproof dish coated with oil, place each tomato, nestled closely together. Bake for about 15–20 minutes or until tomatoes have started to soften.
9. Serve immediately.

Saturday, May 18, 2013

Roasted Duck with a Strawberry-Rhubarb Glaze over Polenta


My boyfriend will sometimes tease me for my desire to make things out of scratch. "There's really no reason to make homemade Cheez-Its," he'll insist. But it looks like so much fun!

I also enjoy the quality control that comes out of doing-it-yourself. That and the sense of ownership. "This sauce, this sauce isn't Ragu's," I can boast, possibly while planting a tiny flag in middle of the dish. "It. Is. Mine."

Sometimes, though, it simply comes down to availability. Whaddaya mean you don't carry squash blossoms because they're too delicate to ship? FINE, THEN. I'LL JUST GROW MY OWN SQUASH. (Look for an upcoming blog on tempura squash blossoms!)

With this recipe, I could not readily find the required demi-glace, so why not make it? Essentially it's reduced espagnole sauce combined with stock. Espagnole sauce is one of the five French mother sauces, and I love challenging myself to the complicated balance of French gastronomy.

The sauces weren't difficult. Just involved. I did not have veal stock for the demi-glace, so I went with beef. Forgivable, I hope! For the most part, the success of the sauces comes down to the simmer. They bring themselves to perfection.


Mirepoix. Isn't that a lovely term? It refers to a collection of aromatics--usually the above pictured celery, carrots, and onions--used to add flavor to stocks and sauces.


The cheesecloth for the bouquet garni does not absolutely need to be unrolled in a dramatic fashion. But it does add a certain something to the proceedings.


Before adding the sachet, I brought the sauce to a boil.

Then I added in my bouquet garni and let it simmer. So much fun! I don't know why I don't cheesecloth my sauces more often.

Once the espagnole was created, I added two cups of brown stock and let it boil and then simmer for another twenty minutes.

After which I strained out the mirepoix.


Once the duck was done roasting...


And the radicchio and chard were sauteed...


You can plate it all together!


And drizzle the finished sauce on top.

Much more direction below!

Roasted Duck with a Strawberry-Rhubarb Glaze over Polenta

1 3 - 5 lb. duck, fat removed
1 cup strawberry rhubarb jam (recipe here)
1 teaspoon rosemary
2 tablespoons olive oil
Salt and freshly ground pepper
1 lemon, punctured several times
4 sprigs fresh thyme

1/2 cup onions, diced
1/4 cup carrots, diced
1/4 cup celery, diced
1 1/2 tablespoons unbleached flour
2 tablespoons butter
3 cups stock
1/8 cup tomato puree
Bouquet garni: 1 bay leaf, 3 sprigs thyme, 3 - 4 parsley stems

2 cups brown stock

3 bunches rainbow chard, chopped
1 large head of radicchio, chopped into 1-inch wedges
1 small onion, cut into 3/4-inch wedges
2 garlic cloves, minced
1 tablespoon butter
2 tablespoons olive oil
2 tablespoons red wine vinegar

1 cup cornmeal
3 cups water
1/4 cup freshly grated Parmesan

1. Preheat oven to 375. In a small saucepan, melt the jam until it is syrupy. Rub the duck with olive oil, then season with salt, pepper, and rosemary. Remove innards and replace with punctured lemon and four sprigs of thyme. Put duck in rack of large roasting pan and baste with melted jam. Roast in oven for one hour (basting several times throughout).
2. Meanwhile, melt two tablespoons butter in a large heavy-bottomed saucepan over medium-high heat. Add mirepoix (onions, carrots, and celery) and saute a few minutes until lightly browned. Stir in flour until roux is formed. Lower heat and cook for 4 - 5 minutes until roux is turning golden.
3. Whisk in stock and tomato puree. Pour slowly but whisk vigorously! Eradicate the lumps!
4. Bring to a boil, then lower to a simmer and add the bouquet garni. Simmer for about 45 - 50 minutes. It's probably best to start the espagnole sauce a little before you put the duck in the oven--bringing it to a simmer about fifteen minutes before you start roasting the bird--to get the timing exact.
5. Once the sauce is reduced to a third of its original volume, remove from heat and take out the sachet. Add in two more cups of brown stock and return to heat, bringing to a boil and then simmering again for twenty minutes.
[Now you're changing your just-produced espagnole sauce into a demi-glace! Pat yourself on the back! While pouring yourself a drink! If you can do all this, I'm sure you're capable of growing hands at will.]
6. Heat three cups water in a medium saucepan over high, bringing to a boil. Stir in cornmeal and lower to a simmer. Stirring frequently, cook for twenty minutes, until all water is absorbed. Add in parmesan, stirring to combine.
6. Heat 1 tablespoon butter and 2 tablespoons olive oil in a large skillet. Add in onions and garlic and sautee until starting to brown.
7. Working in batches, add in bunches of chard and radicchio, cooking until wilted. Once all is wilted, remove from heat and stir in red wine vinegar.
8. Stir in demi-glace to remaining melted jam. Bring to a boil and let thicken for five minutes, then remove from heat.
8. By now, your duck should be done and rested for fifteen minutes. Carve the duck. Then serve over polenta surrounded by a ring of chard and radicchio. Ladle sauce over duck. Enjoy!


Sunday, March 24, 2013

Stuffed Turnips à la Piémontaise


This week's seasonal item was turnips!

I worked Friday night and considered lazing away Saturday morning, but the prospect of going to the farmers' market for the first time in ages propelled me upward and onward. I even remembered to bring a bag with me!

Ponchatoula strawberries graced almost every stand, and while I couldn't resist picking some up, I wanted challenge myself with an ingredient that's not so immediately appealing.

I've never cooked with turnips, and I think I've only eaten them once--kebabs served over turnip cakes, woo boy--but I knew I couldn't go wrong with a recipe from Larousse's Gastronomique, which occasionally terrifies me, but I'm getting better about confronting that fear.


The objectives here [I'm watching my boyfriend play GoldenEye 64--please excuse the lingo] were to prepare risotto, hollow out and blanch turnips, and puree the scooped-out flesh from the turnips.


Once the turnips were blanched and the risotto prepared, I stuffed the latter into the turnips and put them in a buttered gratin dish to roast.


We served these on the side of roast chicken stuffed with lemon thyme, which was finishing roasting in the oven as I added the turnips.


    And here we have a lovely, French-inspired dinner.


Stuffed Turnips à la Piémontaise
Serves 3 - 4 (as side)

5 turnips, washed, peeled, and hollowed out
Scooped-out turnip flesh, reserved and pureed
3/4 cup of arborio rice
1 small yellow onion, diced
3/4 stick butter
3 cups chicken stock and 1/3 cup stock, divided
1 cup white wine
Salt
Pepper
Breadcrumbs
Freshly grated Parmigiano Reggiano (or parmesan)

1. Preheat oven to 400.
2. For risotto, melt two tablespoons butter in a medium saucepan. Add onions and cook, stirring frequently, until they are golden-brown.
3.  Stir in arborio rice for 2 - 3 minutes.
4. Add enough chicken stock to cover the rice. Bring mixture to a simmer, stirring often. When the liquid has been absorbed by the rice, add 1/4 cup wine and 1/4 cup stock. Continue to do this for 16 to 20 minutes, until rice is fully cooked. Add salt, pepper, and pureed turnip flesh.
5. Meanwhile, add turnips to a large pot of boiling water. Let cook for 8 minutes, then remove them to a colander and set it under cold, running water.
6. Once the turnips have cooled, pat them dry and place them in a buttered gratin dish. Stuff each turnip with 1 - 2 tablespoons risotto, remaining chicken stock, and remaining butter (melted). Top with breadcrumbs.
7.  Roast in oven for about 30 minutes. Test doneness with a wooden skewer.
8. Sprinkle each turnip with grated cheese.
9. Serve!


Sunday, January 13, 2013

Boeuf Bourgignon


Could not stop impersonating Julia Child while making this! Boeuf bourguignon!

I must issue the disclaimer that this is not a true production of the dish, because I did not use burgundy, as I was already slightly breaking my bank in the making of this and the only bottle I could find (after visiting both Fresh Market and my neighborhood store) was $40. I'm a little disappointed with myself on that note, but I still used a French pinot noir and the sauce was aaaabsolutely fantastic. So I would say it's a perfectly acceptable substitute!

My favorite part about making this was getting to make a bouquet garni for the first time.


I began by placing the diced salt pork and rind in a saucepan, covering them in water, and bringing it to a boil for a couple of minutes. Then I drained the pan and set aside the diced pork.

For the bouquet, I unfurled two 22-inch lengths of cheesecloth and then unfolded each to make a 22x8-inch piece. I stacked the cloths and draped them over a medium bowl. Then I added my lovely aromatics (onions, carrots, crushed garlic cloves, thyme, parsley, black peppercorns, bay leaves, oh my!), bundled up the cheesecloth and secured it (twine would have been ideal, but I "elected" to use floss. Substitutions, my friends!)

I love cooking when it's actually light out! When my boyfriend saw this picture, he thought for a second I had bundled up one of the cats for an "artistic" shot. Cat Sacks - they won't catch on.
I placed the bouquet in my Dutch oven and preheated my (American) oven to 300.

Then I set my cast-iron skillet over medium heat and sizzled up some salt pork till it was browned and crispy (about 12 minutes.)


I made sure to press down on the pieces as I cooked them to render the fat.

After I added the pork to the Dutch oven, I poured out all but two teaspoons of the rendered fat--then I set these teaspoons to the side.

Next came the beef. After slicing my beef into two-inch chunks, I patted the pieces dry and seasoned them with salt and pepper.

I handled the browning in two rounds, spreading the pieces out in a single layer in my cast-iron (with the heat now raised to high) and flipping them over once or twice to make sure they browned on all sides.

During the slicing process.


After the first batch, I put the beef into the Dutch oven, added half a cup of water to the skillet and swirled it around, scraping up the browned bits. This too went into the pot.


I then browned the second batch of beef (adding the reserved fat from the salt pork). After adding it to the burgeoning stew, I repeated the water process and poured the resulting liquid into the pot.

I returned the skillet to the burner and set the heat to medium. I melted four tablespoons of butter, then whisked in the flour once the butter ceased foaming.

Then the mixture had turned golden (with a nutty aroma), I whisked in the low-sodium chicken broth and 1 1/2 cups of water. I raised the heat to medium-high and stirred the liquid as it simmered.

Once it was thickened, I poured it into the Dutch oven--along with 3 cups of wine, tomato paste, salt and pepper.


I finally turned the heat on under my Dutch oven, setting it to high. Once the liquid was boiling, I covered the pot and transferred it to the preheated oven (like Russian stacking dolls, these ovens are!)

Then I cleaned my kitchen and listened to Frightened Rabbit, because I am a sometimes-responsible young lady (with a tendency to let her musical horizons stagnate, because Van Morrison often makes other tunes unnecessary. But I'm growing!) and this stage of the recipe takes 2 1/2 - 3 hours.

When it was finally time to exonerate the oven from its larger oven prison (TWO-FOUR-SIX-OH-ONNNNNE! - though I do not mean to imply that the things I cook are miserable), I set it on the (off) stove and removed the bouquet garni, setting it in a mesh strainer above the pot and essentially juicing the remaining liquid into the stew.

I scooped out the beef with a slotted spoon and set it aside.


I let the liquid rest in the pot for fifteen minutes before skimming off the fat.

Then I brought it to a boil over medium-high heat. Without reducing the heat, I let it simmer--giving it the occasional stir--for about 20 minutes. Ultimately, the sauce should be reduced to about three cups and thickened slightly.

I got to work making the garnish. I used fresh pearl onions, boiling them for a few minutes and then rinsing with cold water so I could easily squeeze them out of their peels. It might be easier, though, to buy the frozen, already-peeled version. Your choice!

Using a medium skillet, I mixed the pearl onions, butter, sugar, 1/4 teaspoon salt, and 1/2 cup water and brought them to a boil over high heat.

Then I covered the skillet and reduced the heat to medium-low, letting them cook for 5 minutes until the onions were tender.


I uncovered the skillet and raised the heat to high again, letting all the liquid dissipate.

Then I stirred in the mushrooms and another quarter-teaspoon of salt and let the vegetables brown for 5 minutes, stirring frequently.


I set the vegetables aside before adding water to the skillet and scraping the browned bits from the bottom of the pan (poured this into the stew as well.)

Once the sauce was reduced and thickened to my liking, I reduced the heat to medium-low and added the beef, vegetables, brandy, and the last of the bottle of wine. (No worries--we got another bottle to enjoy with the meal.)

Then I covered the pot once more and heated the stew through for five minutes.

After convincing my cat that she didn't want to lounge on my placemat, we sat down to dine.

I can't resist now...bon appetit!

Beef Bourguignon (adapted from Cooks Illustrated)
Serves 6.

Bouquet Garni

2 medium carrots, roughly chopped
2 medium onions, roughly chopped
1 head garlic, cloves separated and crushed but not peeled
10 sprigs fresh parsley, quartered
6 sprigs fresh thyme
12 black peppercorns
2 bay leaves, crumbled
1/2 oz dried porcini mushrooms (optional)
Salt pork rind

Stew:


6 oz. salt pork cut into 1x1/4x1/4 inch pieces (rind removed and reserved for bouquet)
4 lbs. chuck roast, trimmed of fat and cut into 2-inch chunks
Salt
Pepper
Water
4 tablespoons butter
1/3 cup flour
1 3/4 cups low-sodium chicken broth
3 cups burgundy or pinot noir (a true burgundy is obviously ideal, but you can't always break the bank)
1 teaspoon tomato paste

Garnish:
10 oz. white mushrooms (whole if small, halved if medium, quartered if large)
36 white pearl onions, peeled
1 tablespoon butter
1 tablespoon sugar
3/4 cup water
2 tablespoons brandy (or cognac)
2 tablespoons minced parsley


Thursday, March 22, 2012

Homemade Croissants


Bonjour! For my birthday, my lovely older sister gave me Peter Reinhart's Artisan Breads Every Day. The book is brilliant. It somehow enables even the clumsiest bakers (such as myself) to produce glowing and edible goodies such as the ones pictured above.

The croissant consists of two basic parts: the detrempe and the butter block. I made the detrempe a day ahead. First I whisked together flour, salt, sugar, and yeast in a large mixing bowl. To this concoction I added milk and water, then finally the melted butter. I poured the butter in slowly and used a steady whisking to incorporate the drizzle.

Then I plugged in my hand mixer (with paddle attachments) and worked it through the flour mixture on the lowest speed for a minute. I scraped the dough down from the sides of the bowl, then kept mixing at the low setting for another 30 seconds. Reinhart says the dough should be "coarse, wet and shaggy." If it's too dry, splash in a little water. Too wet? Add flour.

When my dough was the perfect texture, I amped up the mixer to medium-high for fifteen seconds, until the dough seemed more coherent, not falling apart in the churning of the mixer.

I rolled the dough out onto a large, lightly floured cutting board and shaped it by hand--don't you love playing around with dough? If you've got an apron on and no pressing reason to go near your laptop, that is--into a large ball.


I grabbed another somewhat-large mixing bowl and poured a little vegetable oil in the bottom, then swirled the bowl around to coat the sides.

Then I hefted the large dough-ball into the bowl and covered the top with plastic wrap. Miraculously, it was able to take shelter in my fridge, where it stayed overnight.

It was about 24 hours later when I returned to my croissant project. I began by moving my three sticks of butter from the refrigerator to the freezer for about 20 minutes.

I then took the butter and chopped it into sixteen pieces. I took one of the many large mixing bowls I've been forced to amass and added the butter in with two tablespoons of flour.

Make sure you do a load of dishes between detrempe day and butter block day. That might be your style anyhow, but I realized belatedly I would need the hand mixer paddles festering in my sink and was setback about thirty minutes while they were sanitized.

Anyway! I used the aforementioned handmixer on a low setting at first, which made the butter look like it was shedding. I used a silicone spatula to scrape the mixture down from the sides, then kept mixing until the butter and flour started to become one. As with the detrempe, I raised the speed until the flour and butter came fully together to form a lumpless paste.

I then turned the butter out onto a large piece of parchment paper mister with cooking spray. I gave the butter a spritz of Pam as well before covering it with plastic wrap. With the help of my dough scraper, I formed the butter into a perfect six-inch square, 1/2-inch thick and smoothed on top.

Mmmm, healthy living.
Now was the time to return the detrempe to the thrilling world of room-temperature. Thanks to the oil, I easily slid the dough-ball from the bowl and onto my lightly-floured-work-surface.

After sprinkling it with flour, I rolled out the dough until it was a rectangle 12.5 inches wide and 6.5 inches long. I then flipped the butter block from the parchment paper onto the left half of the rectangle, situating it until left with a 1/4-inch border on the top, bottom, and left sides.


I lifted the right side of the rectangle and laid it flat on the butter block, crimping the edges in order to envelop the filling.

The next step in the process is called lamination. My last experience with lamination was abusing the machine at my fathers office to preserve my well-done crossword puzzles and favorite Marmaduke cartoons, but this was something different. I am revealing this now because I believe we have surpassed the statute of laminations.

I lifted the dough on each side to sprinkle more flour beneath--you do not want this dough snagging during the delicate lamination process. Then I rolled out the dough--using a firm but not overly-pressured hand--into a rectangle 9 inches long and 16 inches wide. Get used to these measurements, you will use them quite a few times in the upcoming steps. For the rolling-out process, Reinhart recommends starting from the center and pushing out to the corners, then pushing out from the center to the sides. If the dough begins to struggle or snap back into place, let it rest a few minutes before attempting again. For the most part, it's a nice, obedient dough.

Once I reached the coveted size, I used my dough scraper to form the corners into actual points, rather than rounded approximations.

I then folded the dough as you would a letter before stuffing it into an envelope.


The dough rested, covered loosely in plastic wrap, for twenty minutes at room temperature (most of this I occupied by washing my hands and taking pictures of the little beauty.)

Then I rolled it out again, with the closed edge of the "letter" facing me, to--you guessed it!--a 16-in x 9-in rectangle. I folded it letter-style, covered it in plastic wrap, and let it rest this time in the refrigerator--as Reinhart directs if you notice your butter is getting too soft.

I rolled the dough out one more time to the regular rectangle. After a twenty-minute-refrigeration, I returned the dough to the floured counter--first ensuring that I had room enough to roll out a rectangle 24-28 in. wide and 9 in. long. You've hit the big-time!

When I had stretched the dough out to this length, I used the ruler on my dough scraper to measure and mark every 4 inches along the bottom of the rectangle. Then at the top, I started measuring from two inches in--again marking every four inches with a dot.

The dashes are from the first time I tried measuring and I messed up...
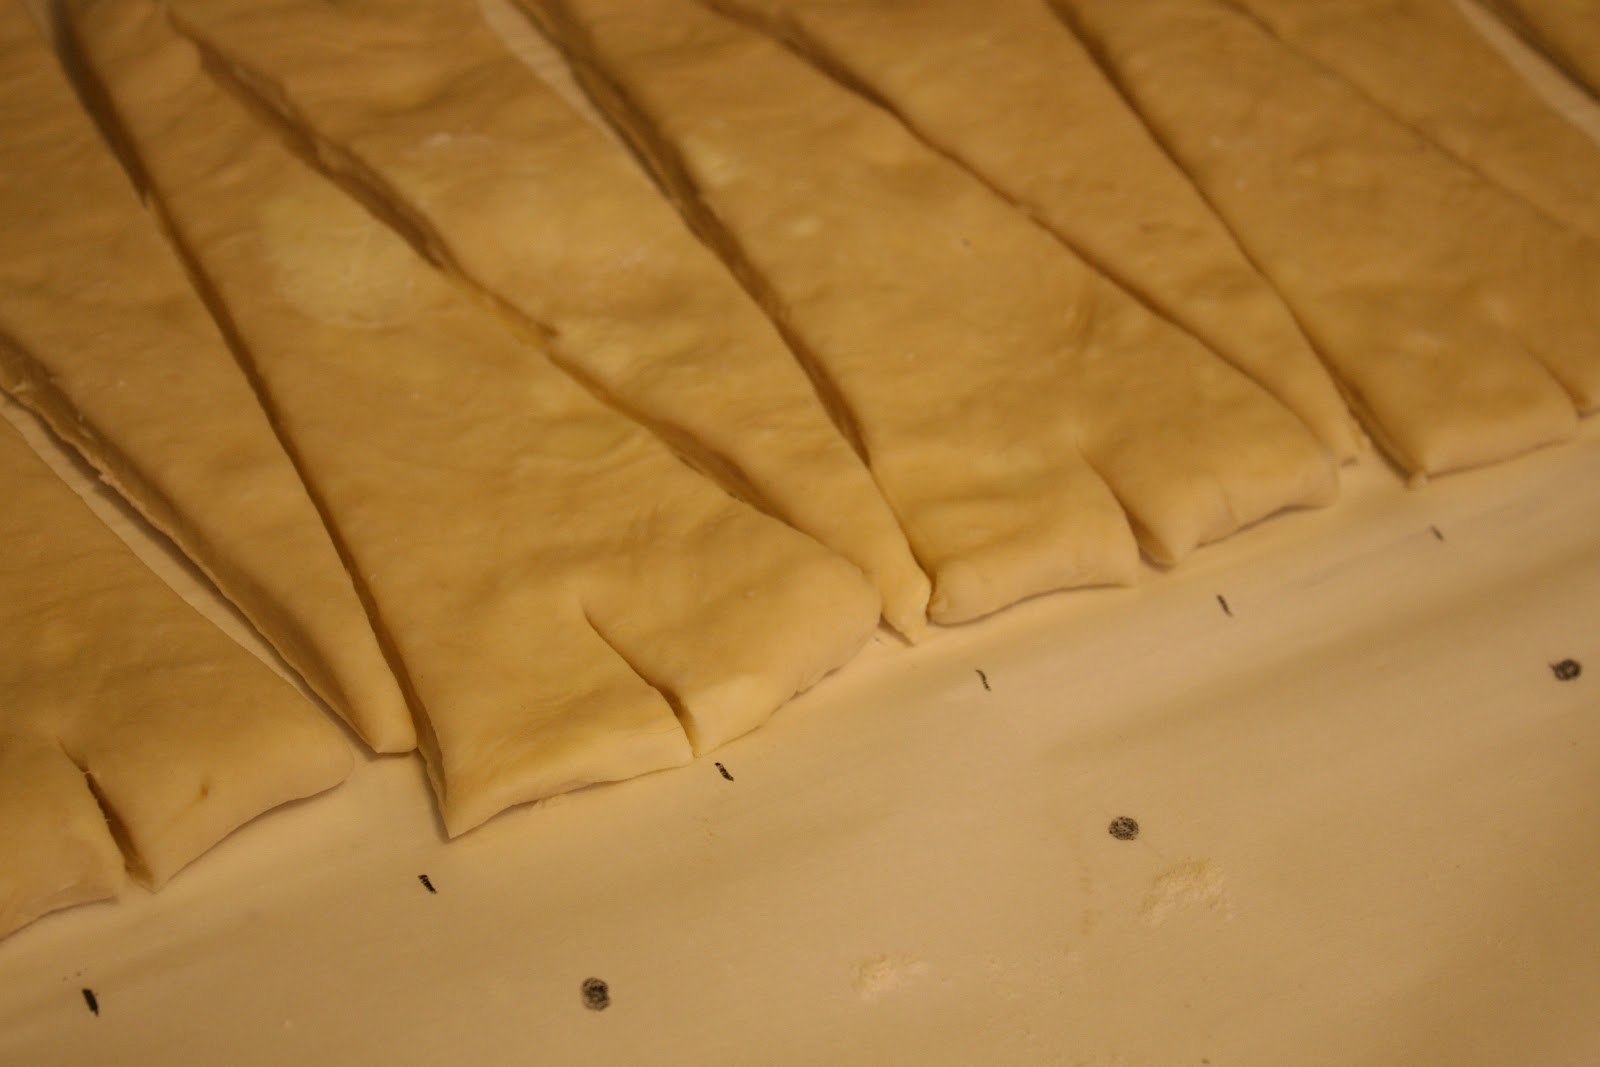
Once the dots were all in place, I used the scraper to cut triangles out of the dough, slicing from a dot at the bottom to its equivalent at the top. This produced a series of triangles approximately 8 inches long with a 4-inch base (the length would shrink once it was cut out from the dough.)

Then at the center of each 4-inch base, I cut a 1-inch notch into the bottom.

Like mini-Eiffel Towers! Appropriate, non?

I then spread these notches wide, like wings, and rolled them up toward the point of the triangle, pulling on the point to elongate each roll.

These rolls should form anywhere from 5-7 "steps." If you wish to have more, you can twist the edges of each croissant.

Not a Pillsbury can in sight!
After the croissants were rolled up, I placed them on two sheet pans lined with parchment paper. Then I underwent another waiting period of 2.5 hours. Talk about Hunger Games...

Twenty minutes before I was ready to bake, I preheated the oven to 450. Ten minutes later, I created an egg wash with two egg yolks and two tablespoons of water beaten together. I brushed this over each croissant to give it a certain sheen (who wouldn't want their croissants to be Winning?).

I put the pans in the oven, immediately lowering the heat to 375. The croissants baked for thirty minutes total--though I rotated the pans halfway through. About ten minutes before they were done cooking, I noticed a few of the croissants getting fairly dark, so I lowered the heat to 330 to let them finish out their days.

And I still had to wait to eat these bad boys...damn you, baking!

 Finally after waiting 45 minutes (more like 37...) for the croissants to cool, we were able to dig in. Light, flaky, and scrumptious! (All things you do not want your scalp to be!)

Homemade Croissants (from Peter Reinhart's Artisan Breads Every Day)

DETREMPE
4 2/3 cups unbleached bread or all-purpose flour
1 3/4 teaspoons salt, or 2 1/2 teaspoons coarse kosher salt
1/4 cup sugar
1 tablespoon instant yeast
3/4 cup plus 2 tablespoons cold whole or low-fat milk
1 cup cool water
2 tablespoons unsalted butter, melted or at room temperature

BUTTER BLOCK
1 1/2 cups cold unsalted butter
2 tablespoons unbleached bread or all-purpose flour

Bon appetit!