Sunday, June 24, 2012

Karniyarik (Stuffed Eggplants with Meat)


Oh, it's been forever!

Within the past couple of months, I've changed jobs, gotten a new camera lens, and cooked plennnty, but somehow it was difficult to sit down and write about the deliciousness I'd been concocting. I've missed it, because it's so useful for record-keeping and analyzing what I can do better next time. So I'm back!

Tonight I adapted a recipe from Claudia Roden's Arabesque--eggplant stuffed with meat (or karniyarik), a Turkish dish that benefits from the Season of Eggplant I'm thoroughly enjoying.

First I took the eggplants, trimmed the stems, and divided the skin into 1/2-inch segments, peeling every other one. Then I soaked them in a bowl of cold salted water for thirty minutes.


I drained the vegetables on paper towels. While they dried, I heated up two tablespoons of sunflower oil in a Dutch oven. I added the eggplants to the heat, one at a time, and browned them on all sides until they were lightly golden.

I let the eggplants drain once more on paper towels and heated up two more tablespoons of oil in my cast-iron skillet. I put the onions on, stirring them occasionally, until they were translucent soft. To this I added ground beef and cooked it for five minutes, separating and pressing it down into the oil with a fork. At this point, I stirred in the diced tomato, tomato paste, cinnamon, allspice, salt, pepper, and parsley. I lowered the heat and let the beef simmer.


Meanwhile I preheated the oven to 350 and sliced lengthwise slits into each eggplant on one of the bare strips, leaving an inch margin on either end. At this point, I need to recommend that you get skinnier eggplants than I did. I worked with what WalMart had, which wasn't entirely satisfactory and I had to roast the dish for ten minutes longer and still wasn't able to brown it all through. Close though! And still delicious.

Anyhow! I slit the eggplants and pried them open, pressing the sides to create a wider hollow. Then I took the beef off heat and spooned it into the pocket. I laid the beautiful nightshades side-by-side in a large baking dish and topped each with a tomato slice. I poured half a cup of tomato juice into the dish, covered it with foil, and put it in the oven for 50 minutes. (If you are able to acquire skinnier eggplants, I'd go for 40.)

During this period, I made falafel from a box mix from World Market, and it turned out much better than the falafel I tried to make a year and a half ago before I owned a food processor.


Then I took the eggplants out of the oven and dug in!


Karniyarik (Stuffed Eggplants with Meat) 
(adapted from Arabesque by Claudia Roden)
Serves 2-3
2 thin, medium-size eggplants
salt
sunflower oil
1 onion, chopped
8 oz. lean ground beef
1/2 tablespoon tomato paste
1 tomato (half diced, half sliced)
1/2 teaspoon cinnamon
1/4 teaspoon allspice
black pepper
2 tablespoons chopped flat-leaf parsley
1/2 cup tomato juice

Monday, April 2, 2012

Garlic Lime Shrimp over Rigatoni


I don't cook too much shellfish. My boyfriend's not a huge fan, and it's not difficult to avoid when there are so many other intriguing and exotic recipes out there. But sometimes you just need to cave in and cook elaborate dinners for yourself. Leftovers can be a beautiful thing! (You can also do this with breakfast if you get up too early and want to congratulate yourself for doing so.)

With a little ingredient preparation, this recipe is simple and straightforward.


Once I had everything peeled, deveined, and minced, I heated up two tablespoons of olive oil over medium-high heat in a large skillet (I used my cast-iron.) At the same time, I started the pasta cooking according to package directions.

To the skillet, I added the shrimp, onion, garlic, and red pepper. Then I added the Tony Chachere's seasoning and Worcestershire sauce. I sauteed the mixture for about ten minutes, stirring frequently, until the shrimp were cooked and the onions browned.

After the pasta was done, I strained it and returned it to the same pot, stirring in a tablespoon of butter till it melted.

I tossed the shrimp mixture with freshly squeezed lime juice and chopped cilantro, then ladled it over a bowl of buttery rigatoni. Finally, I sprinkled bread crumbs over the shrimp and stirred it all together. Voila!

Garlic Lime Shrimp over Rigatoni

30-40 shrimp, peeled and deveined
2 tablespoons olive oil
1 red pepper, seeded and diced
One small onion, diced
5 cloves garlic, minced
1 tablespoon Tony Chachere's seasoning (if you can't get this wonderful Cajun seasoning, substitute a mixture of cayenne, salt, pepper, and garlic powder. But really, you need this seasoning.)
1 tablespoon Worcestershire sauce
1/4 cup chopped cilantro
The juice of one lime
1/4 cup breadcrumbs


Thursday, March 22, 2012

Homemade Croissants


Bonjour! For my birthday, my lovely older sister gave me Peter Reinhart's Artisan Breads Every Day. The book is brilliant. It somehow enables even the clumsiest bakers (such as myself) to produce glowing and edible goodies such as the ones pictured above.

The croissant consists of two basic parts: the detrempe and the butter block. I made the detrempe a day ahead. First I whisked together flour, salt, sugar, and yeast in a large mixing bowl. To this concoction I added milk and water, then finally the melted butter. I poured the butter in slowly and used a steady whisking to incorporate the drizzle.

Then I plugged in my hand mixer (with paddle attachments) and worked it through the flour mixture on the lowest speed for a minute. I scraped the dough down from the sides of the bowl, then kept mixing at the low setting for another 30 seconds. Reinhart says the dough should be "coarse, wet and shaggy." If it's too dry, splash in a little water. Too wet? Add flour.

When my dough was the perfect texture, I amped up the mixer to medium-high for fifteen seconds, until the dough seemed more coherent, not falling apart in the churning of the mixer.

I rolled the dough out onto a large, lightly floured cutting board and shaped it by hand--don't you love playing around with dough? If you've got an apron on and no pressing reason to go near your laptop, that is--into a large ball.


I grabbed another somewhat-large mixing bowl and poured a little vegetable oil in the bottom, then swirled the bowl around to coat the sides.

Then I hefted the large dough-ball into the bowl and covered the top with plastic wrap. Miraculously, it was able to take shelter in my fridge, where it stayed overnight.

It was about 24 hours later when I returned to my croissant project. I began by moving my three sticks of butter from the refrigerator to the freezer for about 20 minutes.

I then took the butter and chopped it into sixteen pieces. I took one of the many large mixing bowls I've been forced to amass and added the butter in with two tablespoons of flour.

Make sure you do a load of dishes between detrempe day and butter block day. That might be your style anyhow, but I realized belatedly I would need the hand mixer paddles festering in my sink and was setback about thirty minutes while they were sanitized.

Anyway! I used the aforementioned handmixer on a low setting at first, which made the butter look like it was shedding. I used a silicone spatula to scrape the mixture down from the sides, then kept mixing until the butter and flour started to become one. As with the detrempe, I raised the speed until the flour and butter came fully together to form a lumpless paste.

I then turned the butter out onto a large piece of parchment paper mister with cooking spray. I gave the butter a spritz of Pam as well before covering it with plastic wrap. With the help of my dough scraper, I formed the butter into a perfect six-inch square, 1/2-inch thick and smoothed on top.

Mmmm, healthy living.
Now was the time to return the detrempe to the thrilling world of room-temperature. Thanks to the oil, I easily slid the dough-ball from the bowl and onto my lightly-floured-work-surface.

After sprinkling it with flour, I rolled out the dough until it was a rectangle 12.5 inches wide and 6.5 inches long. I then flipped the butter block from the parchment paper onto the left half of the rectangle, situating it until left with a 1/4-inch border on the top, bottom, and left sides.


I lifted the right side of the rectangle and laid it flat on the butter block, crimping the edges in order to envelop the filling.

The next step in the process is called lamination. My last experience with lamination was abusing the machine at my fathers office to preserve my well-done crossword puzzles and favorite Marmaduke cartoons, but this was something different. I am revealing this now because I believe we have surpassed the statute of laminations.

I lifted the dough on each side to sprinkle more flour beneath--you do not want this dough snagging during the delicate lamination process. Then I rolled out the dough--using a firm but not overly-pressured hand--into a rectangle 9 inches long and 16 inches wide. Get used to these measurements, you will use them quite a few times in the upcoming steps. For the rolling-out process, Reinhart recommends starting from the center and pushing out to the corners, then pushing out from the center to the sides. If the dough begins to struggle or snap back into place, let it rest a few minutes before attempting again. For the most part, it's a nice, obedient dough.

Once I reached the coveted size, I used my dough scraper to form the corners into actual points, rather than rounded approximations.

I then folded the dough as you would a letter before stuffing it into an envelope.


The dough rested, covered loosely in plastic wrap, for twenty minutes at room temperature (most of this I occupied by washing my hands and taking pictures of the little beauty.)

Then I rolled it out again, with the closed edge of the "letter" facing me, to--you guessed it!--a 16-in x 9-in rectangle. I folded it letter-style, covered it in plastic wrap, and let it rest this time in the refrigerator--as Reinhart directs if you notice your butter is getting too soft.

I rolled the dough out one more time to the regular rectangle. After a twenty-minute-refrigeration, I returned the dough to the floured counter--first ensuring that I had room enough to roll out a rectangle 24-28 in. wide and 9 in. long. You've hit the big-time!

When I had stretched the dough out to this length, I used the ruler on my dough scraper to measure and mark every 4 inches along the bottom of the rectangle. Then at the top, I started measuring from two inches in--again marking every four inches with a dot.

The dashes are from the first time I tried measuring and I messed up...
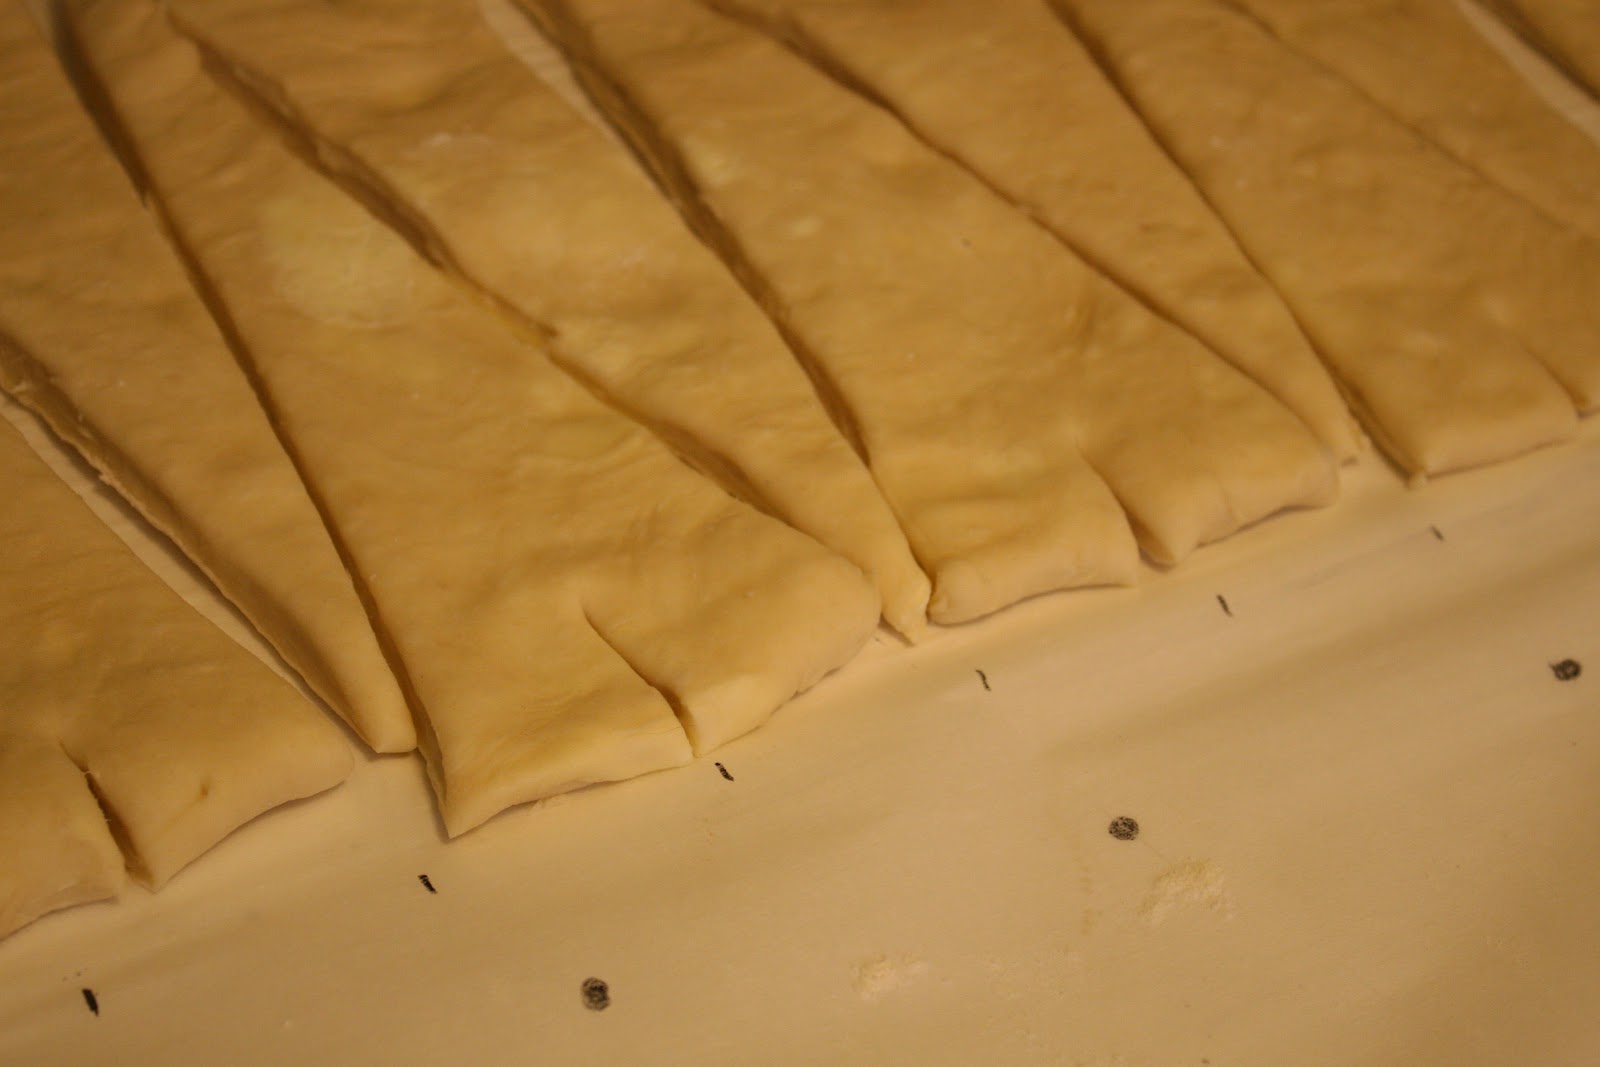
Once the dots were all in place, I used the scraper to cut triangles out of the dough, slicing from a dot at the bottom to its equivalent at the top. This produced a series of triangles approximately 8 inches long with a 4-inch base (the length would shrink once it was cut out from the dough.)

Then at the center of each 4-inch base, I cut a 1-inch notch into the bottom.

Like mini-Eiffel Towers! Appropriate, non?

I then spread these notches wide, like wings, and rolled them up toward the point of the triangle, pulling on the point to elongate each roll.

These rolls should form anywhere from 5-7 "steps." If you wish to have more, you can twist the edges of each croissant.

Not a Pillsbury can in sight!
After the croissants were rolled up, I placed them on two sheet pans lined with parchment paper. Then I underwent another waiting period of 2.5 hours. Talk about Hunger Games...

Twenty minutes before I was ready to bake, I preheated the oven to 450. Ten minutes later, I created an egg wash with two egg yolks and two tablespoons of water beaten together. I brushed this over each croissant to give it a certain sheen (who wouldn't want their croissants to be Winning?).

I put the pans in the oven, immediately lowering the heat to 375. The croissants baked for thirty minutes total--though I rotated the pans halfway through. About ten minutes before they were done cooking, I noticed a few of the croissants getting fairly dark, so I lowered the heat to 330 to let them finish out their days.

And I still had to wait to eat these bad boys...damn you, baking!

 Finally after waiting 45 minutes (more like 37...) for the croissants to cool, we were able to dig in. Light, flaky, and scrumptious! (All things you do not want your scalp to be!)

Homemade Croissants (from Peter Reinhart's Artisan Breads Every Day)

DETREMPE
4 2/3 cups unbleached bread or all-purpose flour
1 3/4 teaspoons salt, or 2 1/2 teaspoons coarse kosher salt
1/4 cup sugar
1 tablespoon instant yeast
3/4 cup plus 2 tablespoons cold whole or low-fat milk
1 cup cool water
2 tablespoons unsalted butter, melted or at room temperature

BUTTER BLOCK
1 1/2 cups cold unsalted butter
2 tablespoons unbleached bread or all-purpose flour

Bon appetit!

Monday, March 5, 2012

Chicken alla arrabbiata (aka ANGRY BIRD)


Mmmm, another dish selected by Andy, so of course it's the best. He's got an eye for the delicious (lasagna timpano, for instance.) Tonight we sought out to make penne alla arrabbiata, but with a little meat added in order to make it an entree (for carnivores.)

To begin with, I heated up a couple of tablespoons of olive oil in my cast-iron skillet, then added the chicken, cooking it for 6-7 minutes on each side until it was well-browned.

Meanwhile I cooked my pasta according to the directions. I used strozzapreti, which is a kind of wheat semolina pasta. It looks a bit like a long macaroni. After the pasta was done cooking, I drained it and set it aside.

Once the chicken it was browned, I reserved it on a plate. To the same skillet I added the chopped onion and cooked it till it was translucent. It began to brown quite quickly because of the residual oil from the chicken, so I was careful to lower the heat a bit below medium to keep the onion from burning.

I then added the minced garlic and a couple of dashes of cayenne pepper to the skillet. I cooked the garlic for a minute or two before pouring in white wine and raising the heat up to moderately high. I waited a couple of minutes to let the wine reduce, after which I returned the chicken to the skillet, along with the peeled tomatoes, oregano, parsley, and shredded salami.

I lowered the skillet to a simmer and covered it for 40 minutes. Then I removed the lid, raised the heat to medium-high, and let it cook for an additional ten minutes while the sauce thickened.


Then I poured the sauce into the pot with the pasta and stirred it all together. I topped each serving with a sprinkle of pecorino romano and chopped green onions.


Too good.

Chicken alla Arrabbiata (adapted from Italian Food Forever)
Serves 4
1 lb boneless skinless chicken breasts, cut into small pieces
16 oz pasta (something like penne or semolina or strozzapreti)

1 small onion, diced
5 cloves garlic, minced

2 dashes cayenne pepper
1/4 cup dry white wine
1 can whole peeled tomatoes
1/2 teaspoon oregano
4 slices Genoa salami, shredded
Salt and pepper

Monday, February 20, 2012

Asian Salmon Salad


Man, 2012 has not been a fruitful year for my blog so far. Work is time-consuming, and I got so many lovely cooking things for Christmas that I've barely been able to break in. But here we are! I've got a refreshing day off and I knew I had to write up last night's dinner.

I haven't ventured far into Asian cuisine in my kitchen. In fact, I'd say this is the farthest I've gone--but I can't wait to try more. I'm a big fan of making sauces and dressings from scratch, and these dishes offer plenty opportunities to flex my love.

Onto the recipe! I began by whisking together ketchup, brown sugar, lime juice, teriyaki sauce, and sesame oil into an aromatically nutty concoction.

I set the dressing aside and went to work on prepping my salmon. First I patted the filets dry and rubbed them with brown sugar. In a small bowl, I combined tahini sauce, soy sauce, Dijon mustard, and rice vinegar. Then I brushed the mixture all over the salmon.

I heated my grill pan to medium-high and drizzled it with oil. Once the oil was hot but not smoking, I slapped on the fish. I cooked it for five minutes on each side, rotating the salmon halfway through to achieve aesthetically pleasing cross-hatches.

Meanwhile, Andy chopped the cucumber and cilantro, because he is a much more methodical chopper than I am. How I loathe to finely dice ingredients. I think I'm going to invent shatterable onions, where you can slam them down on the counter and they explode like ice. Voila! There's your mince.


Anyway! Andy combined the mixed greens, carrots, and cucumbers in a large salad bowl. I tore the salmon into chunks. Then we each constructed our salads on the plate. First pulling from the large salad bowl, then sprinkling on the slivered almonds and raw noodles, then topping the salad with salmon chunks and drizzled dressing. Very flavorful and somewhat healthy!


Asian Salmon Salad
Serves 2-3

For the salmon:
2 6-oz salmon fillets
3 tablespoons brown sugar
2 tablespoons tahini
2 tablespoons Dijon mustard
1 tablespoon soy sauce
1 tablespoon rice vinegar

For the dressing (adapted from AllRecipes):
1/4 cup ketchup
3 tablespoons teriyaki sauce
2 tablespoons lime juice
2 tablespoons sesame oil
2 tablespoons brown sugar

For the salad:
5 cups mixed greens
1 cup raw chow mein noodles
1 1/2 cups carrots, shredded
1 cup cucumber, chopped
1/4 cup cilantro, finely chopped

Tuesday, January 17, 2012

Roasted Garlic Potato Soup


Tonight was definitely a soup night--due to slight physical illness and an urge to use a couple of my Christmas presents. I cobbled together a few ingredients from around my kitchen and came up with a mouthwatering concoction.

First  things first, I preheated the oven to 400 degrees. Then I chopped the top third off my head of garlic and wrapped it in foil, then drizzled olive oil down into the wrapping.


Then I spread the onion wedges out on a baking sheets and seasoned them with basil, thyme, and rosemary. I tucked the foiled garlic onto the sheet and roasted the lot for 30 minutes.

The view into the oven
 I put the potatoes in my Dutch oven (one of my lovely Christmas presents!) and covered them with water. I added the vegetable bouillon cubes and brought the water to a boil, stirring occasionally.

Around this time, I removed the garlic and onions from the oven and allowed them to cool. Once the potatoes had boiled for around ten minutes, I squeezed the roasted garlic out of the peel and stirred in the onion wedges.

Then! I took my wonderful immersion blender (another Christmas present!) and blended the soup, until most but not all of the potatoes were mashed. If you don't have an immersion blender, pour half your soup into a food processor or blender, mix it, and then add it back into the main pot.

I added the heavy cream and sour cream let the mixture cook through for another five minutes, then took it off heat. I ladled the soup into a bowl, sprinkled it with dill weed, salt, and pepper and topped it with a dollop of sour cream. Definitely the cure for what ailed me.


Roasted Garlic Potato Soup
Serves 3.

4 red potatoes, two peeled, all cubed
Half an onion, chopped horizontally into wedges
One head garlic
1/2 teaspoon basil
1/2 teaspoon thyme
1/2 teaspoon rosemary
Olive oil
4 cups water
2 vegetable bouillon cubes
2/3 cup heavy cream
1/3 cup sour cream
1/4 teaspoon dried dill weed
One dollop sour cream
Salt
Pepper

Monday, January 16, 2012

Baked Egg Boats


Today's recipe was adapted from Spoon Fork Bacon, which seems very cute and wonderful and I can't wait to delve into it more. Andy stumbled upon the recipe a week or so ago, and we've been itching for the chance to try it. That chance was today!

I chopped all the ingredients that needed to be chopped and placed them in their own separate bowl, because that's the level of organization for which I'm striving in my life (this week.) Therefore I had my Gruyere, Parmigiano-Reggiano, onions, and spinach chopped/grated before the bacon even hit the frying pan. If you're using fresh garlic (which is always preferable but not always on hand), mince up that sucker now too.


I preheated the oven to 350. Then I took my loaf of bread and cut a V into it, cutting down until I was a half-inch from the bottom. I pulled out some of the stuffing and set the loaf aside on a baking pan.

Then Andy fried the bacon while I cracked the eggs into a medium mixing bowl and then beat in the heavy cream. Once the bacon had fried, Andy removed it from the pan and placed it on a paper towel to drain before crumbling it into a million little pieces.

I reduced the heat on the pan to medium-high, then added the onions and garlic. After a minute, I threw in the chopped spinach and sauteed everything for another three minutes.

To the egg mixture, I added the onions, spinach, garlic, bacon, and cheeses, whisking it all together and then pouring the filling into the loaf. I placed the pan in the oven and baked it for about 30 minutes. You'll know it's done when the eggs are golden-brown and puffing out of the top.


Et voila! You are a culinary champion! You have officially made brunch! You will spend the rest of the day full and telling yourself, "But eggs are good for me, right? And bread...cheese...we all need cheese to live."

But then you will stop your overworrying, because that is the balm that delicious things provide.

Baked Egg Boats
Serves 3.

1 loaf French bread
5 eggs, cracked
1/3 cup heavy whipping cream
5 slices bacon
1 onion, chopped
2 cloves garlic, minced
1 cup spinach, chopped
3 oz Gruyere, grated
3 oz Parmigiano-Reggiano, grated